Learn how to enable different tags to improve data visualization and analysis.
As we continue to collect data on unique users, Tags help us run occupation, sport, position, or capability-specific analyses using our data lake. Tags are organized by industry with many different subcategories. See below for examples and tutorials on how to enable Tags.
Enabling Tags for a Team
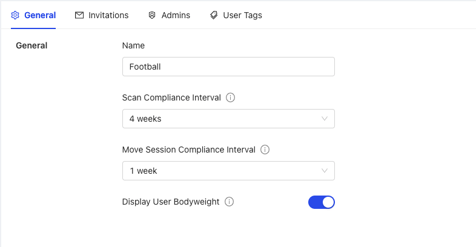
- From the Organization home page, select a Team
- On the next screen, toggle to Settings
- Click "User Tags"

- Select all relevant categories for your Team. The four categories we currently have include Health, Job, Military, and Sport.
- Each category has few to several subcategories, and subcategories have one level below them still. Think of this as Vertical > Category > Tag.
- Health > Population > Special Considerations
- Job > Field > Position or Job Duty
- Military > Job Function > Specialty
- Sport > Specific Sport > Position
- Scroll up to the top of the screen to view the Tags underneath each category. All specialties are automatically enabled. Click to disable, if desired.

- Once finished, click "Save Changes" at the bottom of the screen

Tags an Existing User from Cloud
- Navigate to the User list from the Team dashboard
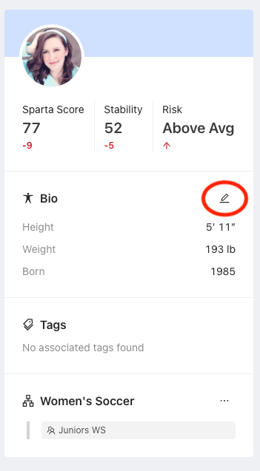
- Click the User's name who you would like to tag, then click the Edit icon in the Bio section of their Profile

- Scroll to the bottom of the edit screen, and use the User Tags section to select all relevant tags for that User

- Click "Save Changes" once finished

Tag a New User
- In order to Tag new Users you are adding to a Team, first enable Tags by following the steps in the top section of this page under Enabling Tags for a Team
- Tag a New User from Cloud:
- Follow the steps in this tutorial to add a User from Cloud
- In the Tags field, select all relevant Tags
- Continue through the remainder of the tutorial and click "Add" when finished
- Tag a New User from CSV import:
- Follow the steps in this tutorial to add Users from a CSV import
- Follow the instructions under step 8e to Tag Users in your upload
- Continue through the remainder of the tutorial to upload
